Since Sydney and I first got married, I wanted to have a plaque with something like our names on it and the date of our wedding. I’m such a Pinterest girly, ya know. There were several variations on the idea, but due to cost and life (and Covid) it just kept not happening. Once I started pursuing woodworking as a hobby, I determined that my goal was to create that plaque myself. I looked into different ways of making it happen over the years: whole names or just initials? wood burning? using a slice of tree wood?
As our 5th anniversary approached, though, I realized that it was the perfect time to finally make this interest a reality — not only to commemorate in an extra special way our first half-a-decade together as man and wife, but also to have some fun by giving something that fell in line with the traditional anniversary gift list. So, a woodin’ I did go…
Squaring Up The Circle

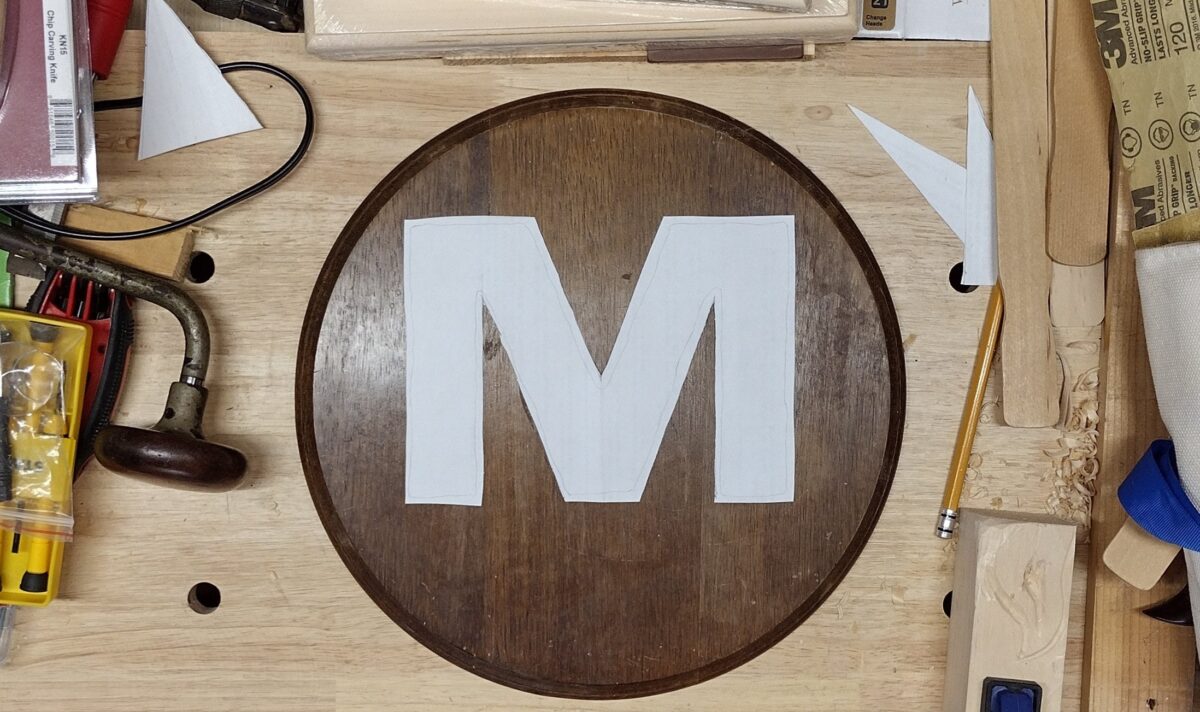
I’d picked up this wood piece as part of one of my random scrap hauls — couldn’t tell you where or from who. It’s a little shy of a foot wide in diameter, and looks to have had a flower-shaped-something on it at some point, which you can see above. Eventually I lightly sanded the front of the piece, only wanting to slightly obfuscate the obvious shape, but I didn’t want to sand too much to remove the finish. I knew that most of the plaque was going to be covered up in the finished product anyways.
So what was my plan? Well, as the first image of this post reveals, I was going to take another piece of wood, cut it into the shape of a letter M, decorate that M in some way, and then plop it onto this circle with the year we were married below that. Easy peasy, certainly. 😉
First, I needed to determine how I was going to decorate the M. I’d settled on finally diving into something that had interested me for years: relief carving. I’d dabbled into that by carving letters for a previous plaque project, and I’d whittled several small items, but I wanted to do something a bit more grand. It was our anniversary, after all! It was mid-August when I started (anniversary end of September), and I’d already ordered two new small carving chisels and several plaques of basswood for the actual carving, so I started collecting images online of what type of design I might like to “fill” this letter M with. Doing a geometric pattern felt too cold for a project celebrating love, so I struck a balance in aiming towards something abstractly floral. I took breaks at work to practice drawing floral patterns and scrolls, and continued doing so at home after Sydney went to bed. I also spent a lot of time just watching videos or live streams of folks carving — watching the angles and how they moved their hands. I photographed the plaque and used my computer to plan out what size and shape the M should be, then printed several blank outlines of that letter M in accurate life-size dimensions to test out different design sketches. Mind you, this was still a surprise gift, so I had to do all of this away from Sydney’s ever-observant gaze. None of this is especially exciting, but I only mention it to point to how much planning went into this project. This was the first actual gift I was making from wood, so I wanted it to be my best work. Considering that, as well as some of my hand-drawn designs were looking, I was also on a time-crunch and ended up finding a generated floral carving online that I used as the base for my design, adding a few changes of my own to the final sketch on paper.

Carving Time
I had to saw off the outer edges of one of the basswood plaques I’d bought, but it otherwise had the right dimensions so I just transferred my design onto it with carbon paper and then it was time to start carving.

This was going to be a small, semi-intricate pattern, so the chisels I’d purchased were also small: a 4mm v-shape tool (Pfeil 12/4) and a 2mm u-shape tool (Pfeil 11/2). I had already practiced with them on a test bit of wood, and they carved like butter, but those first initial chomps into the actual project piece were a little nerve-wracking. Exciting and joyful, but nerve-wracking. So it began. I slowly began chipping away pieces of wood, taking special care on these initial days to ensure that I was only carving into the negative space. This is a carving, so my work was to remove material to leave the revealed shape behind. Each day I worked on this my hand movement became more bold, realizing just how much I could take out at at time safely. I took semi-regular progress photos, to document how things were going, but also to capture my work in case disaster struck and I ruined it all somehow.
That’s the spirit, Mark!
Of course, I didn’t then know what trouble I’d soon run into…


Snap!
Now look, when working with wood, sometimes cracks happen. Trust me, I’ve experienced it plenty in my new ventures. When working on a small piece like this, I was half-expecting such a thing at any turn, realizing that either the whole board itself could crack at some unseen weak point or that I could push too hard/far and carve off something big I wasn’t supposed to.
What I didn’t expect, however, was for my darn chisel to break!

If you’re unfamiliar with wood tool brands, Pfeil tools are pretty nice. I decided to aim towards buy-it-for-life and spent decently to get good tools. Since I was on a time-crunch with this project, I had been skipping my morning routine of working out and spending time before work carving. It was actually working, and at this rate I thought I might actually finish in time for our anniversary! Then one morning, as I was innocently carving away, I heard a loud snap. At first I recoiled with an automatic “oh no” as I’d thought I’d cracked the wood. Not that I was pushing super hard or anything. But no, that wasn’t it. It took me a few moments to then realize, as the chisel in my hand caught the light just right, that the tip of the chisel had a piece missing. It’s so small, I had to really angle it around to see, but yep — as you can see in the photo above, my tool had broken. I then had a laugh looking down to see something shiny embedded in the wood I’d been carving…

I could still do some work with the other tool, but they serve different purposes, and the one that had broken was my workhorse. I emailed the company I’d bought them from and they were great in sending another one out, but that meant that the project was delayed. I did what I could in the meantime, but I needed that small, rounded chisel to really do most of the work by this point in the process. So, some time later and the replacement arrived, and I got back to it.
And then, I kid you not, the replacement tool broke, too.
At this point, I was just confused. I was carving in very soft wood, there were no obvious reasons in the wood for it to be breaking, and I wasn’t doing anything especially intense when they’d snapped. As was explained to me by the online store rep I spoke with, these tools have such a slim bevel, as part of their design to be precise and sharp, that this can just happen. She suggested I could grind it back down on my own… so, though I’m still a novice, I thought I’d give it a shot. I’ve sharpened tools plenty, but never had to reshape a tool tip completely like this. I don’t have a grinder, either, so I took a chance that I could use my diamond sharpening plate to do this. And by golly, with very little effort, it worked! I was pretty jubilant about just how much of an easy fix that was (a few minutes), and then I sharpened and honed the edge down using my usual methods… this time maybe keeping the blade a little bit thicker than before. 😉
Finishing Up… And Finishing


Progress went smoothly after the tool-snapping, but what was intended to be a gift for our 5th wedding anniversary was going to be more than a little late. In the end, it turned out to be almost 2 months late, but Sydney was worth waiting years for, so the delay was symbolic. Yeah, that’s it… I meant it to be this way!
I reached a point where I realized the carving simply had to be done. I could’ve continued carving and smoothing for a long time, but I was at the point of diminishing returns regarding time and quality, so I called it complete. I had left the block as one solid piece while I carved, so I wasn’t putting pressure on thinner stems of the letter M shape, but now it was time to cut it out. This was actually probably the biggest “okay, here we go” moment in a project that was full of them, because I’d already spent so much time on this that if I did a poor job sawing (or broke something) it was going to be quite one heck of a bummer. I prayed, calmed my breath, and then cut the M shape out with extreme ease, I’m glad to say. 🙂
Before adhering the M to the plaque, I wanted to carve out the wedding date, so I’d have more room for my hands to move around. I again tested layouts and styles on my computer, and with my template chosen I got to work. I used the same idea as I had before on a different project, carving into a finished/painted surface to reveal the raw wood underneath as a natural way to “color” my text. I’d decided not to paint the background of my carving, for a variety of reasons (the back wasn’t smooth, too much detail to paint between, room for error and sloppiness was high), so instead I created a light wash of water and brown paint that would help darken the crevices and low points of the carving. During the first pass, I was immediately happy with what I saw. Even knowing it was going to dry lighter than it looked when wet, it was exactly the finishing touch this project needed. So, while I let the M dry between coats, I carved out our wedding date. After the final coat of paint wash had dried, I sanded the outline of the M and lightly sanded over the very top highlights of the carving to add just a little more contrast and help sell the depth all the better. All done with the M and the date-carving, I flipped the plaque over, chiseled out a hole for the wall mount bracket, and then glued the M into place.


The Completed Product

The morning before the evening I finally gave this gift to Sydney, I put a screw into the wall and tested it all out so I could hang it right after she opened it. I’m glad to say she loved it, and ya know what… I do, too.
You can still see the flower pattern on the plaque, but unless you know what it was (which all of you do now… good job, Mark), it blends in with the light sanding scuffs I added and the well-loved charm of the plaque. If you look at this piece up close, it’s really easy to see how rough the carving is in most places. I didn’t have a way to sand down the small detail areas, and I didn’t want to mess with the hand-carved look much, so I left it rough. Seeing it from a distance on the wall, though, it looks much cleaner – and that’s how it was to be displayed so I was okay with it.


From time to time, I find myself looking up and smiling at this project of mine on the wall of our home. I’m really happy with how turned out, I learned a ton, and it was a joy finally diving into the one thing that intrigued me the most about finally start up woodworking as a hobby. This project is where, for the first time, I created something from nothing that I feel is actual art. It’s beginner art, for sure, but I’m glad to have it in our home — as a reminder of the wonderful first 5 years of marriage we’ve had and of how much creativity can be enjoyed! 🙂
