A wood-carving adventure to create something for my wife.
Since Sydney and I first got married, I wanted to have a plaque with something like our names on it and the date of our wedding. I’m such a Pinterest girly, ya know. There were several variations on the idea, but due to cost and life (and Covid) it just kept not happening. Once I started pursuing woodworking as a hobby, I determined that my goal was to create that plaque myself. I looked into different ways of making it happen over the years: whole names or just initials? wood burning? using a slice of tree wood?
As our 5th anniversary approached, though, I realized that it was the perfect time to finally make this interest a reality — not only to commemorate in an extra special way our first half-a-decade together as man and wife, but also to have some fun by giving something that fell in line with the traditional anniversary gift list. So, a woodin’ I did go…
Squaring Up The Circle
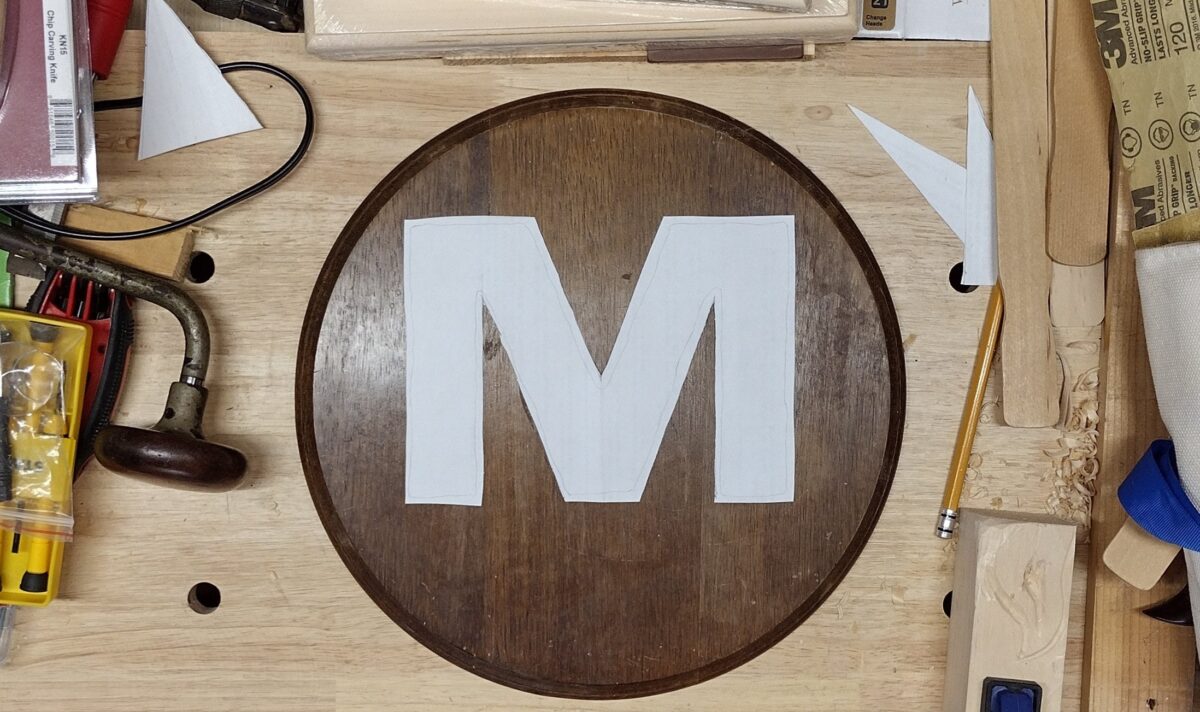
I’d picked up this wood piece as part of one of my random scrap hauls — couldn’t tell you where or from who. It’s a little shy of a foot wide in diameter, and looks to have had a flower-shaped-something on it at some point, which you can see above. Eventually I lightly sanded the front of the piece, only wanting to slightly obfuscate the obvious shape, but I didn’t want to sand too much to remove the finish. I knew that most of the plaque was going to be covered up in the finished product anyways.
So what was my plan? Well, as the first image of this post reveals, I was going to take another piece of wood, cut it into the shape of a letter M, decorate that M in some way, and then plop it onto this circle with the year we were married below that. Easy peasy, certainly. 😉
First, I needed to determine how I was going to decorate the M. I’d settled on finally diving into something that had interested me for years: relief carving. I’d dabbled into that by carving letters for a previous plaque project, and I’d whittled several small items, but I wanted to do something a bit more grand. It was our anniversary, after all! It was mid-August when I started (anniversary end of September), and I’d already ordered two new small carving chisels and several plaques of basswood for the actual carving, so I started collecting images online of what type of design I might like to “fill” this letter M with. Doing a geometric pattern felt too cold for a project celebrating love, so I struck a balance in aiming towards something abstractly floral. I took breaks at work to practice drawing floral patterns and scrolls, and continued doing so at home after Sydney went to bed. I also spent a lot of time just watching videos or live streams of folks carving — watching the angles and how they moved their hands. I photographed the plaque and used my computer to plan out what size and shape the M should be, then printed several blank outlines of that letter M in accurate life-size dimensions to test out different design sketches. Mind you, this was still a surprise gift, so I had to do all of this away from Sydney’s ever-observant gaze. None of this is especially exciting, but I only mention it to point to how much planning went into this project. This was the first actual gift I was making from wood, so I wanted it to be my best work. Considering that, as well as some of my hand-drawn designs were looking, I was also on a time-crunch and ended up finding a generated floral carving online that I used as the base for my design, adding a few changes of my own to the final sketch on paper.
Testing a version of the final design on my computer. I initially floated painting the background blue.
Carving Time
I had to saw off the outer edges of one of the basswood plaques I’d bought, but it otherwise had the right dimensions so I just transferred my design onto it with carbon paper and then it was time to start carving.
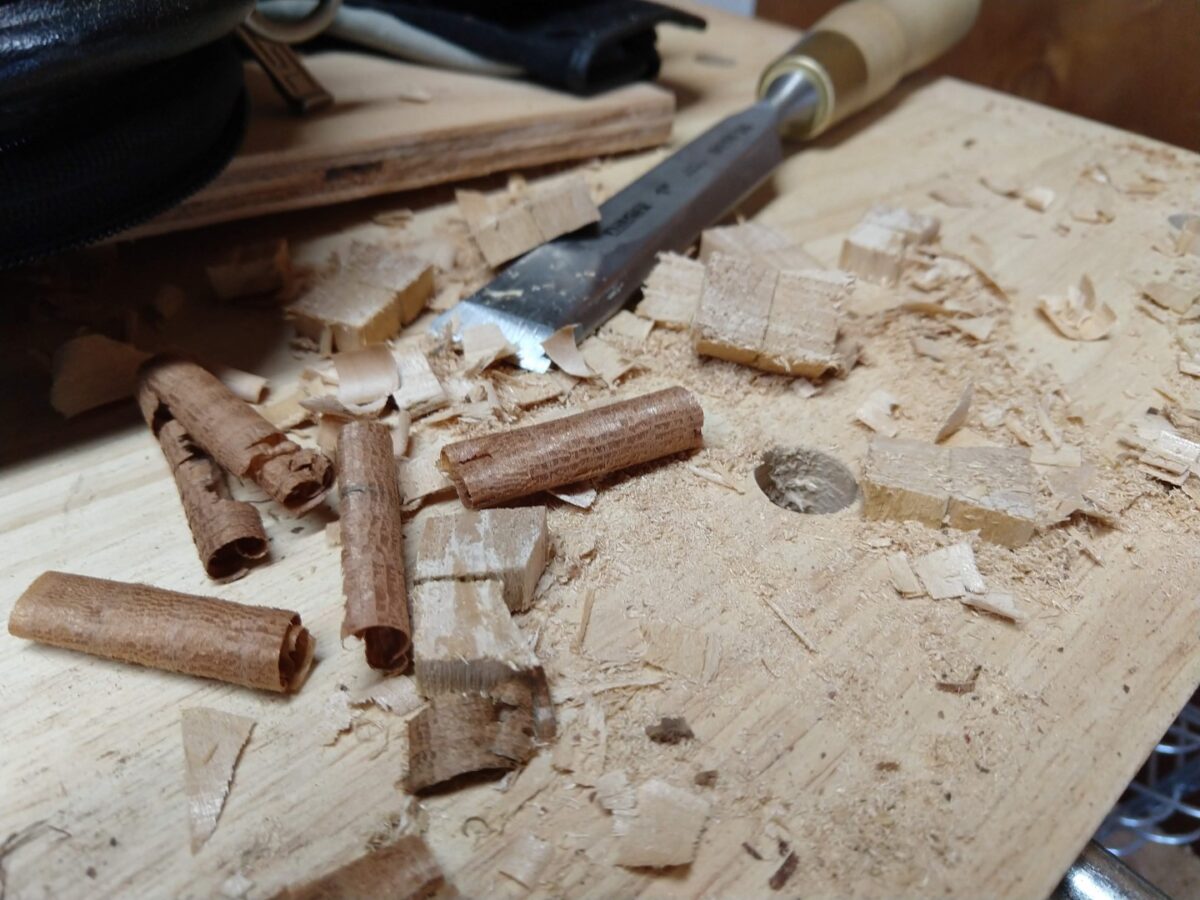
This was going to be a small, semi-intricate pattern, so the chisels I’d purchased were also small: a 4mm v-shape tool (Pfeil 12/4) and a 2mm u-shape tool (Pfeil 11/2). I had already practiced with them on a test bit of wood, and they carved like butter, but those first initial chomps into the actual project piece were a little nerve-wracking. Exciting and joyful, but nerve-wracking. So it began. I slowly began chipping away pieces of wood, taking special care on these initial days to ensure that I was only carving into the negative space. This is a carving, so my work was to remove material to leave the revealed shape behind. Each day I worked on this my hand movement became more bold, realizing just how much I could take out at at time safely. I took semi-regular progress photos, to document how things were going, but also to capture my work in case disaster struck and I ruined it all somehow.
That’s the spirit, Mark!
Of course, I didn’t then know what trouble I’d soon run into…
I also took photos with the overhead light off, to better see how the shadows were developing.
Snap!
Now look, when working with wood, sometimes cracks happen. Trust me, I’ve experienced it plenty in my new ventures. When working on a small piece like this, I was half-expecting such a thing at any turn, realizing that either the whole board itself could crack at some unseen weak point or that I could push too hard/far and carve off something big I wasn’t supposed to.
What I didn’t expect, however, was for my darn chisel to break!
The tip on the right should be a straight line – it’s missing a broken-off chunk.
If you’re unfamiliar with wood tool brands, Pfeil tools are pretty nice. I decided to aim towards buy-it-for-life and spent decently to get good tools. Since I was on a time-crunch with this project, I had been skipping my morning routine of working out and spending time before work carving. It was actually working, and at this rate I thought I might actually finish in time for our anniversary! Then one morning, as I was innocently carving away, I heard a loud snap. At first I recoiled with an automatic “oh no” as I’d thought I’d cracked the wood. Not that I was pushing super hard or anything. But no, that wasn’t it. It took me a few moments to then realize, as the chisel in my hand caught the light just right, that the tip of the chisel had a piece missing. It’s so small, I had to really angle it around to see, but yep — as you can see in the photo above, my tool had broken. I then had a laugh looking down to see something shiny embedded in the wood I’d been carving…
Oh, and look… there’s that missing chunk!
I could still do some work with the other tool, but they serve different purposes, and the one that had broken was my workhorse. I emailed the company I’d bought them from and they were great in sending another one out, but that meant that the project was delayed. I did what I could in the meantime, but I needed that small, rounded chisel to really do most of the work by this point in the process. So, some time later and the replacement arrived, and I got back to it.
And then, I kid you not, the replacement tool broke, too.
At this point, I was just confused. I was carving in very soft wood, there were no obvious reasons in the wood for it to be breaking, and I wasn’t doing anything especially intense when they’d snapped. As was explained to me by the online store rep I spoke with, these tools have such a slim bevel, as part of their design to be precise and sharp, that this can just happen. She suggested I could grind it back down on my own… so, though I’m still a novice, I thought I’d give it a shot. I’ve sharpened tools plenty, but never had to reshape a tool tip completely like this. I don’t have a grinder, either, so I took a chance that I could use my diamond sharpening plate to do this. And by golly, with very little effort, it worked! I was pretty jubilant about just how much of an easy fix that was (a few minutes), and then I sharpened and honed the edge down using my usual methods… this time maybe keeping the blade a little bit thicker than before. 😉
Finishing Up… And Finishing
Carving done… now the easy part. I think.
Progress went smoothly after the tool-snapping, but what was intended to be a gift for our 5th wedding anniversary was going to be more than a little late. In the end, it turned out to be almost 2 months late, but Sydney was worth waiting years for, so the delay was symbolic. Yeah, that’s it… I meant it to be this way!
I reached a point where I realized the carving simply had to be done. I could’ve continued carving and smoothing for a long time, but I was at the point of diminishing returns regarding time and quality, so I called it complete. I had left the block as one solid piece while I carved, so I wasn’t putting pressure on thinner stems of the letter M shape, but now it was time to cut it out. This was actually probably the biggest “okay, here we go” moment in a project that was full of them, because I’d already spent so much time on this that if I did a poor job sawing (or broke something) it was going to be quite one heck of a bummer. I prayed, calmed my breath, and then cut the M shape out with extreme ease, I’m glad to say. 🙂
Before adhering the M to the plaque, I wanted to carve out the wedding date, so I’d have more room for my hands to move around. I again tested layouts and styles on my computer, and with my template chosen I got to work. I used the same idea as I had before on a different project, carving into a finished/painted surface to reveal the raw wood underneath as a natural way to “color” my text. I’d decided not to paint the background of my carving, for a variety of reasons (the back wasn’t smooth, too much detail to paint between, room for error and sloppiness was high), so instead I created a light wash of water and brown paint that would help darken the crevices and low points of the carving. During the first pass, I was immediately happy with what I saw. Even knowing it was going to dry lighter than it looked when wet, it was exactly the finishing touch this project needed. So, while I let the M dry between coats, I carved out our wedding date. After the final coat of paint wash had dried, I sanded the outline of the M and lightly sanded over the very top highlights of the carving to add just a little more contrast and help sell the depth all the better. All done with the M and the date-carving, I flipped the plaque over, chiseled out a hole for the wall mount bracket, and then glued the M into place.
A bowl of paint water, ready to brush on. Masking tape was for lining up the center.First time I’d done this, so I’m happy it worked!
The Completed Product
The morning before the evening I finally gave this gift to Sydney, I put a screw into the wall and tested it all out so I could hang it right after she opened it. I’m glad to say she loved it, and ya know what… I do, too.
You can still see the flower pattern on the plaque, but unless you know what it was (which all of you do now… good job, Mark), it blends in with the light sanding scuffs I added and the well-loved charm of the plaque. If you look at this piece up close, it’s really easy to see how rough the carving is in most places. I didn’t have a way to sand down the small detail areas, and I didn’t want to mess with the hand-carved look much, so I left it rough. Seeing it from a distance on the wall, though, it looks much cleaner – and that’s how it was to be displayed so I was okay with it.
From time to time, I find myself looking up and smiling at this project of mine on the wall of our home. I’m really happy with how turned out, I learned a ton, and it was a joy finally diving into the one thing that intrigued me the most about finally start up woodworking as a hobby. This project is where, for the first time, I created something from nothing that I feel is actual art. It’s beginner art, for sure, but I’m glad to have it in our home — as a reminder of the wonderful first 5 years of marriage we’ve had and of how much creativity can be enjoyed! 🙂
2 movies I like, 2 movies she likes, paintings by Sydney, and now us in the middle of it all!
The first few years of a lifelong interest finally realized.
When last I wrote, I mentioned that I’d have my next post up within weeks — well, those weeks turned into 3 months, but that happens. For some of us, that happens fairly often. Sometimes life comes up or new projects take priority, but usually when I take a long time to do something, it’s simply because there aren’t enough hours in the day for my slow-moving self to get everything done that I’d like. I’ve accepted this (mostly), but it’s also a trend that has come up regularly in what has become one of the bigger hobbies I’ve taken up over the years – making things out of wood. Ready to take a long journey through my first few years in this new creative venture? Let’s start, as one generally should, at the beginning…
I grew up spending cozy Saturdays watching This Old House on TV with my dad, and then on my own. Those types of shows are interesting, to see the growth and restoration of an old building, to experience the tricks and methods implemented by masters of their craft — I even got Sydney hooked on watching more recent episodes of This Old House; a perfect binge show for a rainy afternoon or while under the weather. Even as a kid, though, I was all the more enamored by the spin-off show, The New Yankee Workshop. This 30-minute program, hosted by Norm Abram, was all about building items out of wood: chairs, cabinets, tables, etc.. The real draw of that show was that it was small-scale — just Norm in a workshop, walking us through the process of building something from raw lumber. It was the next best thing to sitting on a stool in a grandfatherly figure’s shop and experience it all first-hand. Dovetail joints, wood grain direction, chiseling, sanding, wood glue — I was just fascinated by it all. Since those early childhood days, I kept a daydream alive in the back of my head that one day I might have a little wood shop space of my own to create beautiful wood pieces.
So, in 2021, I decided to finally scratch that itch and began making my daydreams a reality.
First Steps
Of course, we live in an apartment, so I wouldn’t exactly be able to create a whole barn-sized workshop on my spacious property. We’re lucky enough to rent a place with a single-car garage, though, so I made due with what I had. I bought myself a small workbench that would fit in the space in front of my parked car, and added a shop light overhead, and I was ready to go! My first project was a very rudimentary crafting frame for Sydney (mentioned in a previous post), but even though it didn’t have to be pretty, I took the time to practice and make it sturdy, with half-lap joints at the corners that fit snugly (mostly) and the corner angles were all square. The finished product turned out as it was supposed to and I caused no serious damage to my body in the process, so it was a great success!
The next project I took on was another simple one, but foundational and important. Sydney wanted some shelves for our living room, ones that would be hung from the wall by straps of leather — something she’d seen online. I bought some wood boards, but to do this well I also had to also buy my first wood plane. While I had grown up watching these guys on TV use a lot of power tools and machinery to do woodwork, I’m far more interested in manual tools. Plus, I’m tight on space, so I’m not exactly cramming a table saw or anything into my small garage. A plane is used to shave wood flat, removing small layers of wood on each pass. The boards I bought for this project had to be leveled flat, which meant I had to plane down the wood in certain areas so the surface was all even. With how the leather straps were going to wrap around the boards, and for a little extra visual interest, I decided to use the plane to add a bevel to the bottom front edge of each shelf, too — a decision I knew was the right one, but it was still a little nerve-wracking making those first passes with my plane after I’d spent so long leveling the boards. I also decided that I needed to apply a protective finish to these shelves, since they’d be sitting in our living room, so I had my first experience applying a top coat (General Finishes, water-based)… which didn’t go horribly. Haha, though that’s the best I can say for that as it definitely came with a lot of lessons learned, but it turned out fine. For the leather straps, I had to punch a hole for the screw to pass through to hold it against the wall and also place a metal grommet in each hole so the leather wouldn’t tear. That was a fun adventure, because I hadn’t yet bought a hole punch, so I was doing this by pressing a thick nail through the leather to make the hole and then working hard to get the grommet into place. That took me a long time and some very tired hands, but I got it done eventually. Sydney and I hung the straps into place and the boards have been sitting safely in them for a few years now — holding games, books, and various decorations.
During that previous project I realized that the workbench itself was far too light to withstand any amount of decent horizontal force and would wobble around if I tried planing or chiseling any wood attached to it, so I went and bought a few 50lb. bags of sand and set them on the bench’s bottom shelf. I placed cement bricks between the back legs and the wall behind the bench, to further stabilize it, and it’s been working fine for me that way ever since. One day, if we’re in a larger living space and I don’t expect to be moving anytime soon (i.e. a home purchase), I’ll build a larger, never-gonna-move workbench… but for now, this has served me very well.
Many of the projects listed here also came with the purchase of a new tool — sometimes, as with the aforementioned planer or a couple of fine saws, it was a basic necessity, but as I progressed I found new reasons to need new items that were a little less universal: a small, flexible saw to cut dowels flush with the surface, hole punches, etc.. You’ll see me mention those throughout.
A crucial element to being able to properly woodwork, which you may be very shocked to realize, is having wood to actually build with. For my first projects we bought some wood from Lowe’s — cheap and serviceable. I started keeping an eye on the free sections of Craigslist and NextDoor, though, and over the years have made several collections: two guys who were dumping their scrap wood because they were moving, one who had scrap remaining from a home project, and one of my favorite finds was from someone who had torn down an old wooden fence on their property — more on that one later! Sydney was treated, more than once, to the hilarious sight of finding me unloading never-ending pieces of wood from my ol’ Civic like clowns from a car. I broke down pallets, picked up smaller scraps here and there, and slowly but surely, I amassed enough wood to have my lil’ garage bursting at the seams. I had tall pieces sorted by type between the exposed studs of the garage wall, I made a mini-shelf between other studs to hold smaller scraps, and I eventually hit a point where I just had to stop collecting more.
I also had to start making more things!
Star Bright
The first personal project I took on was the one I’d been thinking about since before I’d even bought my workbench. I wanted to make a star for the top of our Christmas tree. Now, I was still fairly new to all of this, so my expectations as to what I could carve or create was grounded in that noob reality, but I had an idea: what if I used the layers of plywood to my advantage? I’d seen that cutting plywood at an angle could reveal the various layers, alternating between darker and lighter wood as if they were a lined pattern, so I thought that could be an easy way to create an interesting look.
This is probably one of the more important projects I took on, primarily because it was the first real thing I made and I was making it from scratch, but also because I had to learn so many basic skills through making it. I learned how to create a circle and then geometrically lay out the star shape so that it was even. Once I started, I had to learn to deftly control my new handsaws to as to not cut too deeply when cutting the star shape out. I became very comfortable with my newly purchased chisels as I slowly, but surely (but very slowly) started carving out the shape, taking care to keep each arm of the star even in the 3D shape I was creating. I moved cautiously, shaving off a very small amount at a time, until I became more at ease and could move quicker and more boldly chisel off more wood. This star took many nights of work, until I finally reached the point where it felt done. I then had my next experience of applying topcoat, having learned from my previous shelves. I created a leather strap for the back to hook the star to the top of the tree – though that wasn’t done until a few months later, so it premiered on our tree the next Christmas. I’m happy to see it each holiday, as it really turned out exactly as I’d hoped it might.
Patio Upgrades
Before I had started this woodworking endeavor, I’d built a table to hold some plants in our little patio. I thrifted a pair of wooden head/foot boards for a children’s bed to use as the table legs and tore up a pallet to make the top surface. I sloppily (though I tried) cut the pallet boards to similar length length and attached everything with simple nails I had; I have a fond memory of wanting to finish the table but not cause such a ruckus for my neighbors as the day stretched into evening, so I finished hammering the heck outta this table in our living room. That was sure good for the eardrums!
Later, after getting into creating more planned-out woodwork projects, I could look back at that first table I’d pieced together and find the errors: I used the wrong kind of saw (took me forever to cut the wood), the boards weren’t evenly cut because I didn’t measure them correctly, and instead of using something more durable and sturdy I simply used nails which have since become very rusty in the elements. It’s fine, it still stands, but when I decided to add a second plant table to our patio, I planned on doing things a bit more properly.
Remember those fence boards I’d mentioned earlier? They had a wonderful rustic patina on them that really spoke to me aesthetically, so I set to work planning out how this table was going to work in a way that would feature their look as much as the form. I ended up designing a two-level surface, with the back part raised up into a shelf, and I spent a lot of time measuring, planning, and marking before even starting my first cuts. As part of the fence haul I had a couple of thicker pieces I could use as legs, but I needed to use other wood as a frame to make the thing sturdier. I make the upper skeleton support out of whatever random pieces I had available, and then covered it all with the rustic fence boards. I had one that had torn and had a fun curved edge to it, so I used that for the front. Those fence boards were really dirty, so I spent a lot of time just outside of my garage using a wire brush to clean them up — taking care not to ruin the look. I was curious, though, what the wood looked like underneath the sun-beaten exterior, and planing a little of the backside of one revealed a beautiful red grain. I decided to fully plane the he backsplash piece that led up to the back shelf, to reveal that pretty coloring as a contrast against the other gray-brown pieces. Of course, now it’s mostly all covered up by plants, but I’m glad it’s there! Unlike my first table, this time I used outdoor screws for the frame and then glued everything else to keep any hardware from showing on the finished piece. This project not only took time (weeks in the summer heat), but it took the entirety of my garage — I had to park on the street. First I spent a couple of afternoons using a makeshift jig on the ground to plane all of the boards, and then the table itself had to be assembled. It was a little uneven, but not terribly so, and it was structurally sound; any gaps or warped wood was simply part of the intended rustic charm. When it was all done Sydney helped me hilariously carry it through our apartment parking lot, through our apartment (the cat was concerned), and out into the patio — where it sits today, covered in plants and doing its job well.
Shortly after that table was finished, just after I finally could park in my garage again, I took on another project that kicked me out and forced me to park on the street again. This time, I was restoring a wooden folding patio chair my parents had given us. The chair was fine, but the rods that let it fold in and out were tired and a bit rusty, so I wanted to replace them and refinish the whole chair. After trying to find replacement parts, I started to realize that it made more sense to simply remake the chair to no longer fold — the chair was a little wobbly because of that structure, and I never needed to store it folded up anyways. In hindsight, there have been times when it’d be convenient to fold the chair up (sweeping, making space for other projects), but those occasions are rare. First thing was first, though, and I had to strip the white paint from the chair. I do my best to keep harmful chemicals out of our home, so I found a non-toxic paint remover and got to work. It was tough going, and as I went I saw that white wasn’t the original color, either. It seemed the chair had originally been painted black, which after seeing the color of the wood underneath was a darn travesty. The original plan was always to repaint the chair white, and though the beautiful wood tempted me to do otherwise, I couldn’t quite clean it completely and I wouldn’t have been able to match the wood with the additions I was making. It made me a little sad, but I needed to make the practical choice. I had to add new structural support to replace the folding elements I’d removed, so I added a board between the two back legs and a solid wood rod underneath the seat. I’d bought a vintage hand drill and bits off eBay for this project, as I needed to bore through the wood legs to make space for the new, larger rod. I ended up using wood for all of the other connections I had to make, using dowels and glue. I brought Sydney out to the garage to record my attempt to sit in it for the first time, in case it hilariously collapsed under my weight. As you can see below, it held just fine (you can also see the coloring and some of the dowel-work).
What a silly man.
I painted everything up, white as before, and that was another project done. I was on a roll!
Important Things To Say
Not every project I took on was big, though. At least… not in scale. I heard a quote from an old Christian evangelist, Leonard Ravenhill, that really stuck with me: No man is greater than his prayer life. That quote deserved a place in our home in some way, as an important reminder to myself and anyone else who looked at it, so I decided to put it on a plaque.
Now, this project was in conception for months. I considered woodburning the letters, carving them in various ways, but in the end I settled on a plan: paint the center of the plaque white, leave the natural wood around the outside as a visual frame, and carve the letters out of the white center to reveal the wood underneath. Would it work? I wasn’t sure, but there was only one way to find out. Painting was easy, and the plaque was something I already had. Mapping out the letters, however, was the first challenge of this project. I ended up printing an alphabet to use as my letter templates, taking a couple of tries to get the best size, and then I had to sketch out where each letter should go so that it was evenly spaced. I used the computer for this, Photoshopping text over a picture of the painted plaque. During that planning, I realized I needed to just print the text as it was supposed to be (placing the individual letters wasn’t going to work). Once I had that sheet, I traced the words all out over some graphite paper onto the plaque and it was time to carve. I did a lot of online research, as I have for all of my woodworking adventures, on how to carve letters, and in the end I just spent time chiseling away at each one slowly but surely. Sometimes I was in the garage, other times I was on the floor of our living room with Sydney watching something on TV, but eventually I had them all chipped out and my plan had worked out great. I only have one bad cut, in which the wood broke where it wasn’t supposed to, but I was able to glue it in place and it’s only visible up close. The plaque was hung on the wall above our hallway door, and I look at it regularly — of all the things I’ve made, it’s probably the most personally important.
Sharp Pointy Teef!
Not long after I moved into our garage and started setting up my workbench, I noticed that I was not alone in there. I will spare you the saga that is my adventure with rodents in our garage, but let’s just say that it’s been a long one. I’d seen mouse poop early on, and over time there were various solutions and returns. I honestly didn’t mind the little buggers being in there, but then they’d poop on my wood piles and that just wasn’t cool; it was deterring me from more casually working on projects, for sure. The final blow came after I’d started using an electronic mouse trap, successfully mind you, and came out one morning to find the chewed up remains of one of the mice amidst some very large rat turds; presumably the mouse died in the trap and then the larger rodent pulled it out and ate. At that point, I was done, and had to do what I’d wanted to do for a while.
While our garage is single-car, it is actually part of a row of garages that are all connected by open air rafters. I know one of our neighbors’ garages is stuffed with storage stuff they never move, so it’s great breeding ground, and we’re right up against a hill so it makes sense they run through my area. After some research on how tight of a space mice can squeeze through, I bought several spools of the right size wire mesh and spent a very dirty and dusty couple of days cutting the wire into place and cutting my upper garage rafter space off from the rest of the spaces. Again, my poor car got to spend a couple of weeks parked on the street while I went to work in there. I had to use a new staple gun to get it all in place, my gloves were shredded, and my hands worn to the bone, but in the end I had a secure garage again. I then spent days clearing out and reorganizing my piles of wood — throwing scraps away I’d never use and discovering that I’d actually had a little mouse nest buried in one of my giant piles. I bought new wire shelves and arranged everything in the garage so it was not only finally in order, but so that there was no room for new tenants to move in if they did find a way in.
I’m glad to say, though, that I haven’t seen trace of a single rodent in my garage since, though I keep the electronic trap on and baited… just in case.
How Many Plants Do You Need?
Look, I have a problem. I love finding free stuff, and it’s really easy to find free plants online. I still had more of that beautiful fence wood, so I put together two more projects. Two more projects which kicked my car out of the garage again — poor thing.
The first was a planter for the walkway by our front door. This time I planed it all down to the original wood, to reveal the color and grain better, and actually implemented the curved tops of the fence boards into the design. Similar to my previous fence-wood table, I had to add some other-wood framing structure underneath, but this one went together pretty quickly and smoothly. This time, I used nothing but wood and glue to connect everything. I drilled holes in the bottom to letter water drain out, and painted the interior of the basin to help keep the wood from rotting too easily (the dirt in the planter would cover the paint). A few days after getting it into place and filling the planter with dirt, though, I noticed that the front piece was bulging out from the pressure of the dirt behind it. Structural engineer, I am not. 🙂
I emptied it again and added a couple of chunky splines glued into the corners for strength. I used wood of a contrasting color so that it looks a bit more intentional, rather than trying to hide it — now it’s not a cover-up, it’s a feature!
The second fence-wood project is my biggest yet, for sure. My supply was running low, so it’s mostly made of other wood and only features the fence planks for some visual pizazz. Yes, pizazz. With my two plant tables in the back patio and a shelf I’d taken from the dumpster area of our complex for storage, I had a bit of an awkward, unused space in the corner — so what better way to fill it than with another table for plants! #madman
This final table was really a great culmination of knowledge from so many of my other projects. This was the most solid structure yet, it was bigger than the others but didn’t take as long, and I managed to add some lovely little details: the uprights behind the upper boards are planed pieces from old trellises my dad gave me and at the last minute I decided to carve the contrasting-colored dowels into rounded pieces instead of simply sawing them flush. I planned all of the structure from the get-go, so it was stable without any oopsie fixes, and in the end I think it turned out really nice. The front legs had previously been spray-painted blue to act as a police barrier prop for an online show (hi, Nick!), and while I wasn’t able to remove the blue completely (even with my newly acquired electric sander), I kinda like that a bit remains — to remind me of where they came from, and I smile at the memories each time.
Sydney didn’t want to be left out of the plant-having business, though, and our desire to have more greenery inside led to possibly my favorite project, even though it’s not the grandest. We don’t get a ton of sun in our apartment, so not too many types of plants will grow indoors. But air plants could do just fine! Before we bought the new plants, I planned out matching planters that could hang by our window, inspired by wooden orchid baskets I’d seen online. I used the aforementioned trellis wood, planed and sanded, and cut a bunch of pieces of the same length. I cut a dowel in half to use the rounded edges along the top of each planter as way to visually soften the other angular lines. I then needed to drill vertical holes through all of the wood pieces on each end, so I could drop a thin dowel (tooth pick, more like) through each one to connect them at their corners — creating several layers of alternating pieces in a hexagon shape. See the picture to understand what I mean, but before that let me tell ya that the first time I dry fit one of them together and saw that it all worked, I was over the moon. I then had to carefully put the tooth pick dowels in place and glue one layer at a time, but once they were all done, it was smooth and sturdy as heck. I experimented with how to tight twine across the bottom to form the base to hold the plants (so much twine!), and the two aren’t matching in that area, but in the end they turned out really nice. The reason this is one of my favorite projects, if not the favorite, is that I can humbly say I think it’s the most clever. I had inspiration in the style, but the design was something I put together myself, and I really appreciate the simple elegance of how the pieces were connected together.
Of course, that’s not all I’ve done… (tired of reading about wood projects yet?? ‘Never!’ you say? Wonderful.)
Miscellaneous Wood (My New Band Name)
My growing experience with woodworking has led to a lot of smaller projects and fixes, too, over the years. My friend had a wood frame that needed some repair, and it was an easy-peasy fix since I’d had enough experience already by that point.
I sometimes get into the bathroom later at night and would rather not turning the bright light on, so I made a little shelf for a tap light to sit on and set it high up on the wall so it would reflect off of the ceiling and create a nice, soft light in the room.
We were in need of a little more storage space in our bathroom, so I built a cute little shelf — making use of the natural edge of a broken piece of wood as a feature.
I built a small planter to place on my patio table to make use of a cute frame Sydney found in a thrift store, employing a fun little way to hold the frame in place and practicing box joinery methods.
Early on I tried to fix a wooden kitchen chair that had snapped where the back meets the seat, but that fix didn’t take. More recently, having learned a fair bit more, I gave it a second shot with and now it’s probably more sturdy than when it was newer, even if it’s not quite as pretty (like me!).
Sydney found an earring holder that needed space behind it when it hung on the wall, so I put something together real quick — and figured I might as well have some goofy fun when I realized the pieces for the hooks looked a little frog-shaped.
Sydney also wanted a shadow-box for trinketty things, so I used a basic box from Michael’s and then made the shelves out of paint stirrers. Covered in a brown paint-wash and nobody would ever know what it was made out of!
And finally, I wanted a place to store my personal affects in our bedroom, so I found an in-wall bathroom vanity someone was giving away, sanded the old 90’s finish off, added a wood frame around it, and painted it. I created my own wood shelves, cut to perfect size, and custom-fit my own dowels to hold the shelves in place. It has yet to be hung, but that’s more because I have a pile of items in the way that are waiting to be sold online.
Slow But Steady
A lot of these projects I’ve mentioned in only a paragraph took quite a while. There may have been months between conception and action or I may have finished half of it and then returned weeks later to finish it up. Sometimes I was waiting on finding the best method to do something, such as with my carved plaque, while other times I was waiting on delivery of a new tool I realized I’d needed after starting the project. Of course, there were also other times when I simply prioritized other things in life for a bit or moved at a slow pace.
And that’s okay.
I regularly struggle with the idea of not having enough time; my ADHD makes it difficult for me to have a good sense of how long something will take or how much time has passed and my often-scattered mind definitely doesn’t make getting things done in a linear, quick way any easier. This will likely be a lifetime struggle (it has been so far), and even though I can mentally accept reality, it still gets hard sometimes to see time slip through my fingers as much as it does. Writing this post, however, was a great reminder of how many things I’ve actually completed over the last several years. Some of these projects took far longer than I wished they had, and sometimes for no good reason other than I move slowly and can’t get enough done in a day, but hey — they’re done now! Not only that, but I think they’re good enough for me to share, too… my feelings about what I’ve made ranging from content to proud.
Look, I am proud of the progress I’ve made so far, but I also know that nothing I’ve shared is gorgeous, gallery-level woodwork of the utmost skill. It’s been years, and most of my projects have had the safety barrier of being intentionally rustic, but I am still a very amateur hobbyist in this. I’m at the point now, though, where I’m ready to start buying finer wood from a lumber shop for next projects. I’ve learned a lot on the rough scrap wood I’ve come by for free, but I’m ready to start exploring more in the area of finer wood working. Not that we have the room for much more stuff, haha, but that hasn’t stopped me so far!
Ultimately, I love working with wood. The feel of soft, sanded grain, the satisfaction of a clean cut or two pieces fitting together well, the smell of freshly planed shavings… it’s all a sensory delight. Wood is renewable and natural, so it’s a pleasure to work with — even knowing that a planter may naturally rot away over time feels fine, as if I was allowed to borrow something from God’s creation for a time before it returns to the next part of its the cycle. I have felt pride in my successes, and seeing the work of my own two hands around our home brings me joy. I’ve had to learn a lot, and getting into this hobby is a great way to grow your patience levels through adversity, believe me, but it’s always interesting.
And I have so much left to learn and explore!
Speaking of which, my most recent woodworking project is something I mentioned in my last post — an anniversary gift for Sydney. It’s complete now, and she’s seen it, but I’ve already taken enough of your time so I’ll save that for its own post later this month. Until then, friends!
P.S. – If there’s something you’ve wanted to do — a hobby, an experience, a creative pursuit — let me encourage you to do it. Don’t let hindrances of fear or internal discomfort keep you from the potential of being able to make your own daydreams a reality; we only get one life to live, so if there’s something out there that’s calling to you, I say make it happen in whatever little ways you can!
Life is too short to not find our own ways to enjoy it. 🙂